A Push Notification and Its Path
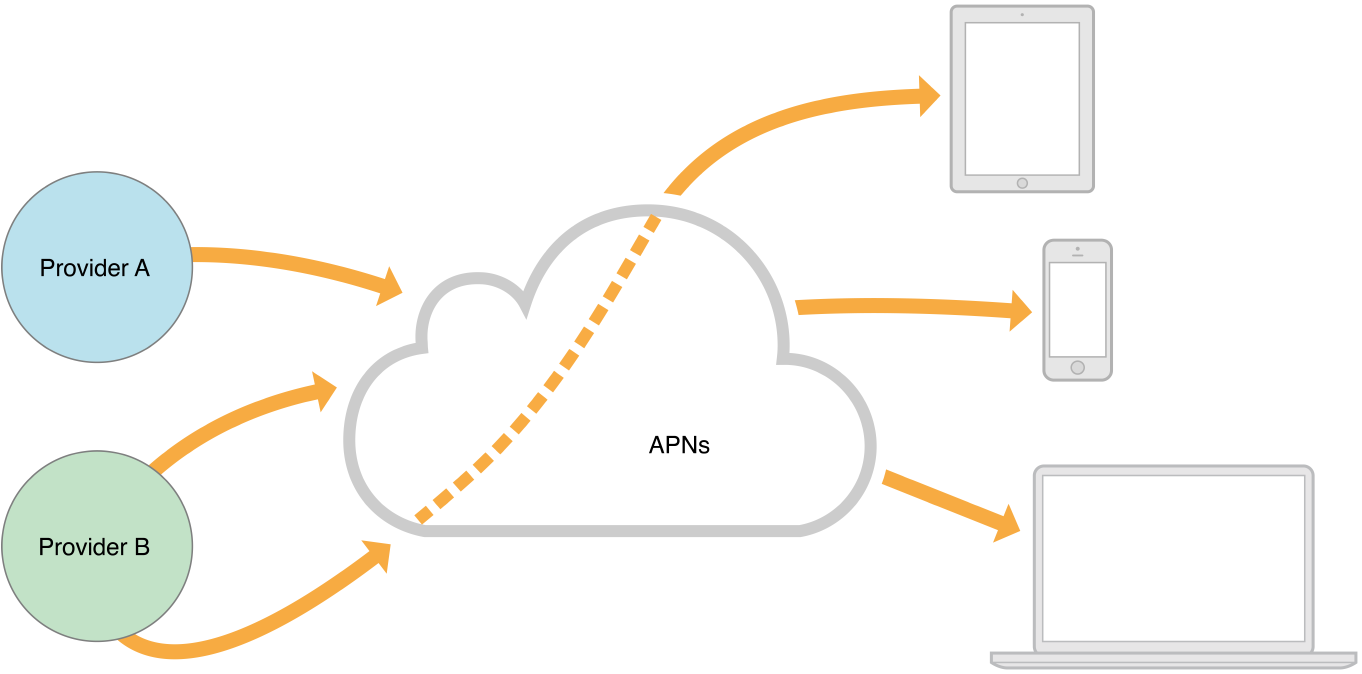
Apple Push Notification service transports and routes a notification from a given provider to a given device. A notification is a short message consisting of two major pieces of data: the device token and the payload. The device token is analogous to a phone number; it contains information that enables APNs to locate the device on which the client application is installed. APNs also uses it to authenticate the routing of a notification. The payload is a JSON-defined property list that specifies how the user of an application on a device is to be alerted.
The remote-notification data flows in one direction. The provider composes a notification package that includes the device token for a client application and the payload. The provider sends the notification to APNs which in turn pushes the notification to the device.

The device-facing and provider-facing sides of APNs both have multiple points of connection; on the provider-facing side, these are called gateways. There are typically multiple providers, each making one or more persistent and secure connections with APNs through these gateways. And these providers are sending notifications through APNs to many devices on which their client applications are installed.
Development and Production Environments
- Development: Use the development environment for initial development and testing of the provider application. It provides the same set of services as the production environment, although with a smaller number of server units. The development environment also acts as a virtual device, enabling simulated end-to-end testing.You access the development environment at
gateway.sandbox.push.apple.com, outbound TCP port 2195.
- Production: Use the production environment when building the production version of the provider application. Applications using the production environment must meet Apple’s reliability requirements.You access the production environment at
gateway.push.apple.com, outbound TCP port 2195.
Creation of the SSL Certificate and Keys
In the provisioning portal of the iOS Dev Center, the team agent selects the application IDs for APNs. He also completes the following steps to create the SSL certificate:
- Click App IDs in the sidebar on the left side of the window.The next page displays your valid application IDs. An application ID consists of an application’s bundle ID prefixed with a ten-character code generated by Apple. The team admin must enter the bundle ID. For a certificate, it must incorporate a specific bundle ID; you cannot use a “wildcard” application ID.
- Locate the application ID for the development SSL certificate (and that is associated with the Development provisioning profile) and click Configure.You must see “Available” under the Apple Push Notification Service column to configure a certificate for this application ID.
- In the Configure App ID page, check the Enable Push Notification Services box and click the Configure button.Clicking this button launches an APNs Assistant, which guides you through the next series of steps.
- The first step requires that you launch the Keychain Access application and generate a Certificate Signing Request (CSR).Follow the instructions presented in the assistant. When you are finished generating a CSR, click Continue in Keychain Access to return to the APNs Assistant.When you create a CSR, Keychain Access generates a private and a public cryptographic key pair. The private key is put into your Login keychain by default. The public key is included in the CSR sent to the provisioning authority. When the provisioning authority sends the certificate back to you, one of the items in that certificate is the public key.
- In the Submit Certificate Signing Request pane, click Choose File. Navigate to the CSR file you created in the previous step and select it.
- Click the Generate button.While displaying the Generate Your Certificate pane, the Assistant configures and generates your Client SSL Certificate. If it succeeds, it displays the message “Your APNs Certificate has been generated.” Click Continue to proceed to the next step.
- In the next pane, click the Download Now button to download the certificate file to your download location. Navigate to that location and double-click the certificate file (which has an extension of
cer) to install it in your keychain. When you are finished, click Done in the APNs Assistant.Double-clicking the file launches Keychain Access. Make sure you install the certificate in your login keychain on the computer you are using for provider development. In Keychain Access, ensure that your certificate user ID matches your application’s bundle ID. The APNs SSL certificate should be installed on your notification server.
To create a certificate for the production environment, repeat the same procedure but choose the application ID for the production certificate.
Installing the SSL Certificate and Key on the Server
- Open Keychain Access utility and click the My Certificates category in the left pane.
- Then you have to export these new cert and the private key of this cert (not the public key) and saved as .p12 files.
- Then you use these commands to generate the cert and key in Mac's Terminal for PEM format (Privacy Enhanced Mail Security Certificate). Launch the Terminal application and enter the following command after the prompt: openssl pkcs12 -clcerts -nokeys -out cert.pem -in cert.p12
openssl pkcs12 -nocerts -out key.pem -in key.p12
- Certificate file is as per your file name. In My scenario it was as cert.12 and key.12 from keychain.
- Copy the
.pemcertificate to the new computer and install it in the appropriate place. - The cert.pem and key.pem files will be used by your own php script communicating with APNS.
- If you want to remove the passphase of private key in key.pem, do thisopenssl rsa -in key.pem -out key.unencrypted.pem
- Then combine the certificate and key cat cert.pem key.unencrypted.pem > ck.pem
- set the file permission of this unencrypted key by using chmod 400 and is only readable by root in a sever configuration. chmod 400 ck.pem
- The testing APNS is at ssl://gateway.sandbox.push.apple.com:2195
- For the source codes to push payload message to the APNS, you can find them in the Developer Forum. This is the one that I used, for php script. Run this (after obtaining the device token from the testing device and with iPhoneClient program setup)
php -f apns.php "My Message" 2 Here there is apns.php file with codehttp://pastebin.com/AGLSA6rM- For iPhone Client Program, you need to edit the bundle identifier to the App ID that you created and imported the new provisioning profile for that APP ID to the XCode and iPhone. And codesign with that new provisioning profile. Then implement the following methods in AppDelegate to Build & Go. -(void)applicationDidFinishLaunching:(UIApplication *)application {
NSLog(@"Registering Remote Notications");
[[UIApplication sharedApplication] registerForRemoteNotificationTypes:(UIRemoteNotificationTypeBadge | UIRemoteNotificationTypeSound | UIRemoteNotificationTypeAlert)];
// Override point for customization after app launch
[window addSubview:viewController.view];
[window makeKeyAndVisible];
}
// Delegation methods
- (void)application:(UIApplication *)app didRegisterForRemoteNotificationsWithDeviceToken:(NSData *)devToken {
const void *devTokenBytes = [devToken bytes];
// self.registered = YES;
NSLog(@"deviceToken: %@", devToken);
// [self sendProviderDeviceToken:devTokenBytes]; // custom method
}
- (void)application:(UIApplication *)app didFailToRegisterForRemoteNotificationsWithError:(NSError *)err {
NSLog(@"Error in registration. Error: %@", err);
}
After getting this token from your code. Just paste that token to PHP file mentioned in Step 11.
Additional tips for sandbox testing
- The feedback service is feedback.sandbox.push.apple.com:2195
- Send your messages to gateway.sandbox.push.apple.com:2195
- Send your messages to gateway.sandbox.push.apple.com:2195